

Your first visual novel
Restore an independent Spring Lights tutorial copy or create a visual novel from the Standard template. Build a choice with two routes, save the project and playtest both endings.
Start a playable visual novel with the Standard template. At a fork in the old street, the player chooses the river or the bookshop. Each route has a narration line and its own ending. You will create scenes, edit a choice visually, save and playtest. No external media, AI account or generation service is needed.
You can also play 今晚,让春天亮起来 (Light up spring tonight) on Examples, then restore its editable tutorial copy using the instructions later in this chapter to practise editing a complete story.
Prepare Studio
Follow Installation and startup to install Studio 0.1.1 for Windows x64. This exercise uses engine 0.1.1 and the Standard template with the default 1920 × 1080 canvas. Prepare a parent directory for practice projects, such as D:\GalCraftProjects.
Create two routes with the Standard template
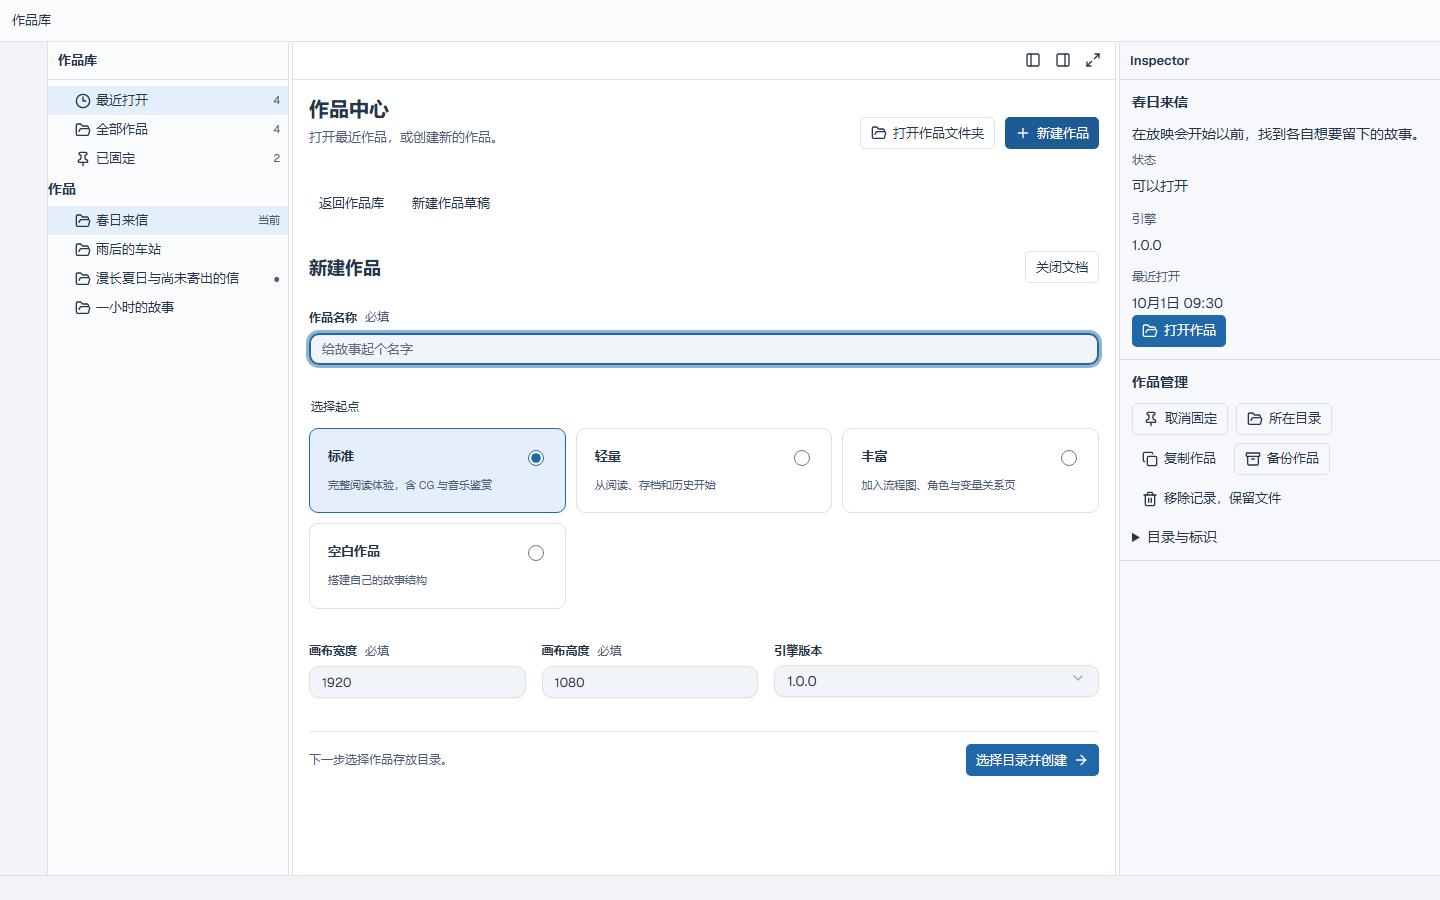
1. Create a project and three scenes
- Choose New project in Project library and enter
Old Street Practicein Project name. - Select Standard, review the canvas and engine, then choose Choose folder & create. Select your prepared parent directory. Studio creates an
Old Street Practicesubdirectory inside it. - In the authoring workspace, choose Scene at the bottom of the left pane. Enter
Old Streetin Scene name and choose Create. - Repeat to create
RiverandBookshop. You can keep the template's original empty scene.
2. Set the story's starting scene
Open Project settings and choose Structure and variables. In Studio 0.1.1, this form's start controls retain Chinese labels: select Old Street under 场景 (Scene), keep 作品起点标签 (Start label) at 场景开头 (Scene beginning), then choose 设为作品起点 (Set as project start). Scene order organizes the project; the project start determines where a new game begins.
3. Write one narration line in each scene
Open each new scene in turn. Choose Add dialogue at the bottom. In New dialogue · not inserted, keep the speaker set to Narrator, enter the text below in Dialogue text, then choose Insert dialogue to submit it. A narration card should appear in the scene.
| Scene | Text |
|---|---|
| Old Street | You stand at a fork in the old street. Where will you go tonight? |
| River | The river reflects the lights. You decide to stay and listen to the wind. |
| Bookshop | You push open the bookshop door. A new story is waiting for you. |
4. Add two choices
- Open
Old Street, choose Add at the end, then select Choice in the command menu. - In Options on the right-hand Add command form, choose Add item twice.
- Enter each option's Text from the table below. In that option's Target → Scene picker, select its actual scene by name; no scene ID is needed.
- Keep the target label, visibility condition, enabled condition and other optional fields at their defaults, then choose Apply. A Choice command with two options should appear at the end of the scene.
| Option text | Target scene |
|---|---|
| Go to the river | River |
| Visit the bookshop | Bookshop |
5. End each route
Open River and Bookshop in turn. After the narration, choose Add at the end, then End story. Keep Destination after ending set to Return to title and the duration at its default of 300 ms, then choose Apply. Leave the ending ID empty for this exercise.
Each route scene should now have two commands: narration → End story. The ending returns Player to its title page instead of continuing to another scene in directory order.
6. Save to disk
Choose Save all (Ctrl + Shift + S) to open Save review. Check the default selection of the project and three new scenes, four objects in total, then choose Save 4 objects to complete the save. Apply updates the editable workspace for preview; completing Save review writes it to disk.
7. Playtest both routes
Open a scene, open Choose playtest start above it, and select From beginning. This starts the playtest directly with the Old Street narration. If text is still typing, click once to complete it and again to continue.
- Advance past the opening narration. Both Go to the river and Visit the bookshop should appear.
- Choose Go to the river, read the river narration, then continue. You should return to the title page.
- Choose 开始游戏 (Start game) on the title page, advance through the opening again, and select Visit the bookshop. Continue after the bookshop narration to return to the title page. Player's menu language is independent of Studio; the default Chinese menu uses 开始游戏 for this action.
| Choice | Expected route text | Result after continuing |
|---|---|---|
| Go to the river | The river reflects the lights. You decide to stay and listen to the wind. | Return to the title page |
| Visit the bookshop | You push open the bookshop door. A new story is waiting for you. | Return to the title page |
Choose Return to editor to go back to the workspace. Use File → Close project, then Open project folder to reopen the Old Street Practice subdirectory Studio created. Check that the three scenes retain their narration, endings and option targets.
If the options do not appear, check that the project starts at Old Street and that its final command is Choice. If a choice opens the wrong route, check both target scenes on that command, apply, save and play from the beginning again.
Continue with Story and performance to add backgrounds, characters or sound. When you are ready to share the story, follow Web publishing to build a standalone release.
Restore a tutorial copy
Follow the Examples page to GitHub Release and download galcraft-tutorial-0.1.1.galproject and the bilingual readme.txt. The backup supports Studio 0.1.1 Windows x64 and contains 213,090,473 bytes (203.22 MiB). Story text is Chinese with Japanese character voices; Player menus support multiple languages.
- Have your galcraft-tutorial-0.1.1.galproject tutorial backup ready.
- Choose Restore backup in Studio's project workbench and select the file.
- Select a fresh destination parent and project folder name, then Create independent copy.
- Choose Prepare and check dependencies. Review engine 0.1.1 and the exact 0.1.0 versions of the Rich template, music-composition plugin and Motion Canvas plugin. Install missing versions before retrying.
- Confirm and open the restored project. It has a new project identity; retain the original backup for future exercises.
Change the tutorial copy and see the result
Select a narration line in the opening street scene and change its text in Properties. Leave the input, choose Save all, and confirm saving the selected objects in Save review. Play from that line; your text should appear in its original story position.
Choose Web and a dedicated empty output folder on Publishing. Check the saved version and build. Run node preview.mjs in the release directory and open its printed address to reach the title page.
Continue with the Sample tutorial, Projects and files, or Basic operations to start from a blank template.